Pyrosales distributes MICC cable (Mineral-insulated copper-clad cable) and accessories. Our most asked question from Electricians is do you have instructions on how to terminate the cable? Below is an instruction guide and video to assist in the process of termination. Below is also a guide to what tools you may require to complete the process.
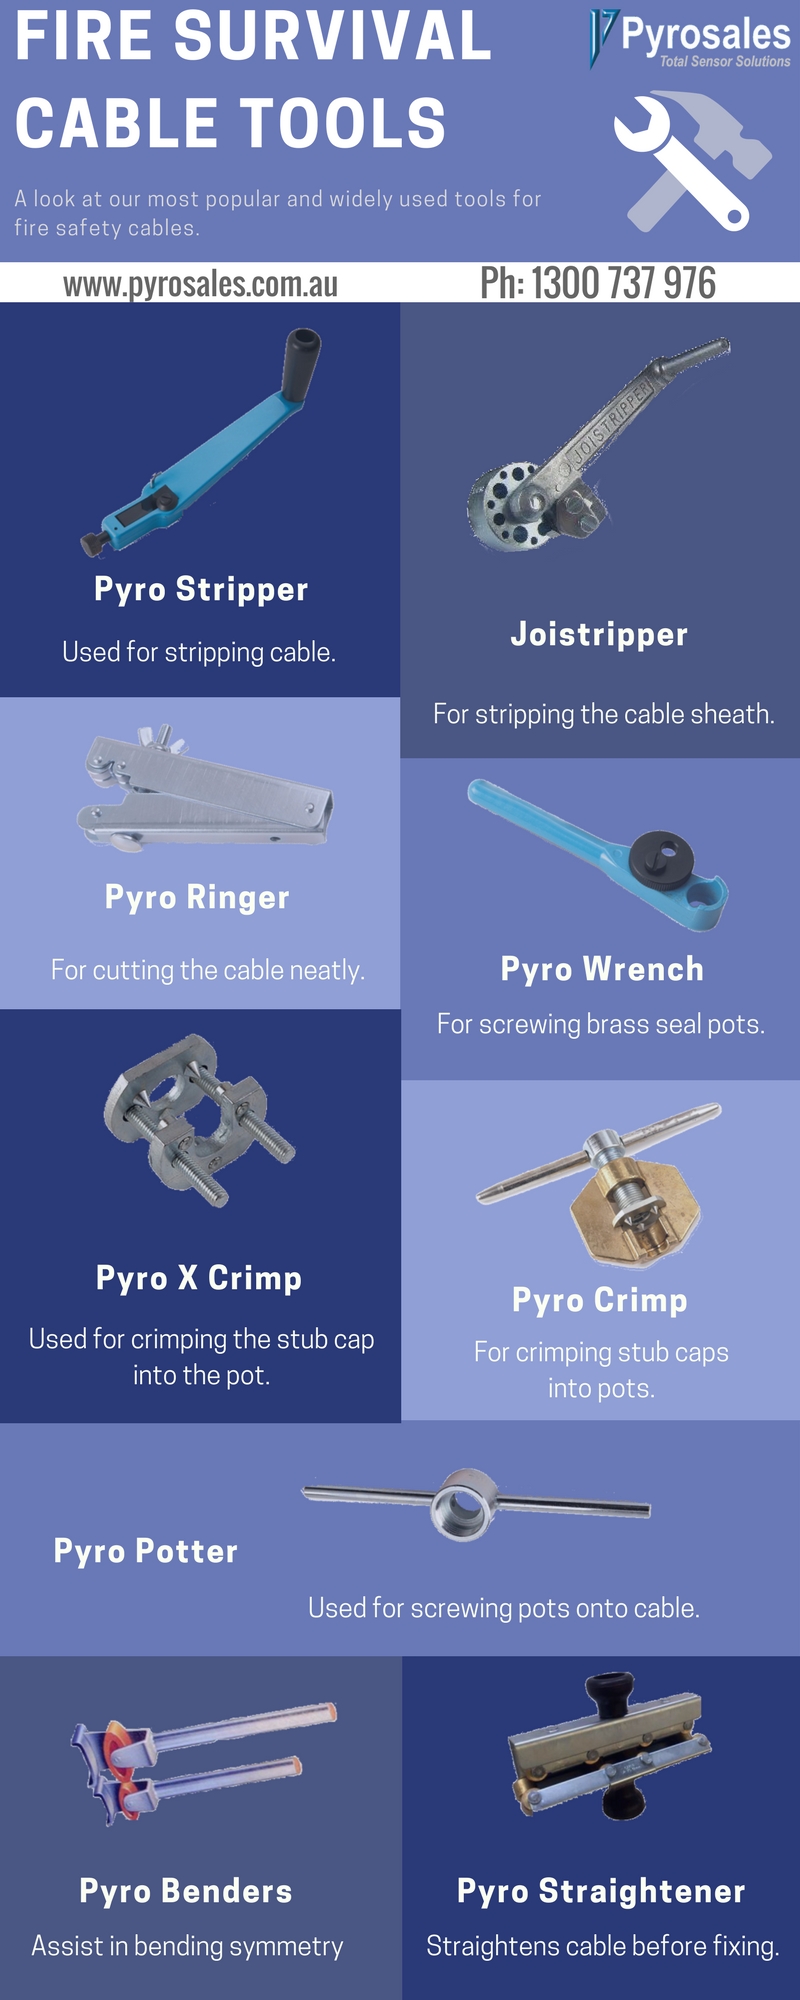
CUT THE CABLE: Cut the cable squarely to the length required, allowing for the appropriate length of conductor tails. It is advisable to use a hacksaw (1), as this will facilitate stripping of the copper sheath.
FIT THE SHROUD (optional) Offer the shroud up to the cable in reverse (2). This will make it easy to determine the amount to cut off (3). Fit the shroud over the cable (4). Measure and mark the covering to the required tail length (5), plus additional length to allow for the gland (this will vary depending on gland size; see table below). Using a knife, remove the plastic covering (6, 7). Do not use the edge of the blade at right angles to the cable, as this may damage the copper sheath.
REMOVE THE PLASTIC COVERING: Measure and mark the covering to the required tail length (5), plus additional length to allow for the gland (this will vary depending on gland size; see table below). Using a knife, remove the plastic covering (6, 7). Do not use the edge of the blade at right angles to the cable, as this may damage the copper sheath.

STRIP THE COPPER SHEATH: Measure and mark the tail length (8), plus an extra length to allow for the seal (this will vary depending on seal size; see table below). Make a second mark a further one tool’s width along the cable (9). Insert the cable into the stripping tool (10) until the end just touches the cutting blade. Beginning with forwarding pressure, rotate the tool clockwise. Forward pressure is not required once stripping has begun, since the tool will pull itself along the cable. Stop the tool at the required position by gripping the cable with pliers at the second mark (11).

FIT THE BRASS POT: Slide the gland (consisting of back nut, compression ring, and gland body) onto the cable (12). Insert the brass pot into the recess of the Pyro Wrench (13), and slide over the cable until the self-cutting thread is in contact with the cable sheath. Engage the ratchet wheel into the lower section of the pot. Applying forward pressure and with a cranking action (14), screw the pot onto the cable (15).
FILL THE BRASS SEAL WITH COMPOUND: Examine the interior of the pot and remove any loose insulation. Slide the stub cap over the conductors and into the mouth of the pot to pre-form the conductors, then partially withdraw it (16). Fill the pot with a sealing compound (17), ensuring that the compound covers the face of the cable to prevent the insulation from absorbing moisture. This can be achieved by overfilling the pot with a compound from one side only, to exclude air pockets. Care should be taken to avoid contamination with the sealing compound, so use the plastic wrapping to keep it clean. Reposition the stub cap in the mouth of the pot with the aid of pliers (18). Do not let it overlap the edge of the pot since this will damage the thin brass lip during crimping.
CRIMP THE DISC INTO PLACE: Fully slacken the hollow drive screw of the Pyro Crimp using the handle. Slide the conductors through the hole in the crimping plate, and through the centre of the drive screw (19). Place the pot into the seating in the body of the tool. Tighten the screw by hand (20), which will drive the stub cab fully into the pot recess and secure it into position by means of the indent crimp. Slacken and remove the tool.
COMPLETE THE SEAL; Cut the conductor insulating sleeving to the required length. Slide it over the conductors and push it onto the stubs to anchor it in place (21). The seal is now complete (22).
COMPLETE THE TERMINATION: Connect the gland to the box and tighten the nut to secure the cable in place (23). If the cable covering has been selected because the cable is being used in a corrosive environment, any exposed copper sheath and brass gland must be covered with adhesive tape at this stage. Finally, position the gland shroud, if using (24).
The termination is now complete!
Pyrosales will terminate for special requests if a customer has all the measurements and sizing. Pyrosales engineers are available to consult on various stages of any project, from the development and planning of a new project to modifying or upgrading an existing facility. Our staff is here to provide you with assistance and recommendations to ensure the best outcome and value. We are happy to visit our clients on-site or conduct meetings at one of our offices.
Pyrosales Pty Ltd has been assessed and approved by QAS International Ltd to ensure we adhere to quality management systems, standards, and guidelines. We continue to hold this certification by maintaining our work and quality practices: ISO 9001 Certificate Number A1066AUS.